Tuesday, July 19, 2011

One-Pot Macaroni with Garden Fresh Vegetables


It's been so overcast and cool here today that it kinda got me thinking that I should do something with the ground beef in my freezer. Normally in Summer we tend to BBQ out with some meat and veggies...but it just didn't feel right for today:)

This meal is great...and sure to please all the males in your house!! Levi normally consumes anything resembling food, but he was done his first portion before Noah even started!! That's gotta stand for something?! It was a hit, nonetheless. The best part was I prepared and cooked the entire thing in under 30 minutes. The second best thing was that I had everything in my pantry or garden to make this dish:)

Feel free to omit or sub any of the veggies...or even chop them tiny so your kids won't notice them;)...a great way to use up surplus from your garden! I can see myself making double and triple batches of this one day for our growing boys and all their friends! One that note...this dish would also freeze well!

ps...I couldn't help but mention that this dish totally resembles Hamburger Helper...talk about a blast from the past...only it's about 150% better for you!!

One-Pot Macaroni with Garden Fresh Vegetables

1 lb lean ground beef (I used bison)
1 chopped onion
3 cloves of minced garlic
1 chopped red pepper
3 chopped carrots
1 tsp each oregano & basil...dried or fresh from the garden!
1/2 tsp salt & pepper
1 can crushed tomatoes
2 cups brown rice macaroni (roughly half the bag)

In large pot or pan saute ground meat over medium heat...cook until no longer pink.

Add everything except the tomatoes and macaroni...cook until onion is softened, about 5 minutes.

Add tomatoes and 3 cups of water...bring to a boil...add macaroni.

Reduce heat and cover...simmer...stir occasionally...until pasta is al dente (a slight crunch).

Feel free to garnish with a sharp grated cheese (I would have if we had some in the fridge!!)...and fresh chopped basil:)

Enjoy!!

Sunday, July 3, 2011

Raw 'Cheese'cake

Well...I did it! I found a recipe that looked yummy...tasted yummy (had it at a good friend's house while our husbands were off at Warrior)...and made it 100% according to the recipe! I NEVER do that!! I either make things up, or see a recipe that looks good...and then end up changing about 89% of the ingredients and directions! Trust me...this recipe needed NO alterations...it's amazing! Made my first one this weekend since Mom and Dad Wiebe were coming to stay with us...needless to say it was well received by all:) Jay was a bit skeptical about how these ingredients were going to turn into a 'cheesecake'...but trust me...he ate his words and his share of cake too! We finished off the last two slivers this afternoon...and am already searching for excuses to make another. This new blog that I'm following is beautiful...I love it...so I thought rather than re-posting the recipe I would just post the link and let you see for yourself! That and I didn't take a single picture of it!! Ha! It's a super simple recipe...especially if you have a high-power blender...and turns out exactly like her photo...takes less than 20 minutes to make once you have soaked your almonds and cashews. Can't wait to try some others of hers! I will note that I didn't have time to search for Meyer lemons...so I used traditional organic ones...it still tasted awesome:) Oh..and I used the last of my frozen raspberries from last season with a little blueberries mixed in:!

I seriously can't say enough about this cake...you could eat it for breakfast! It's nutritionally amazing for you...regardless of the time of day. It's incredibly filling from the amount of nuts in it...so that's a bonus too! It's decadent...full of flavour...attractive...and my new favourite thing:)

This same cake would taste wonderful without the frozen fruit on top and served plain...or with some fresh fruit sliced on top...I'm willing to try many varieties:)

I have a small amount of culinary lavender left in my pantry that Mom Wiebe gave me last year for my birthday...so my next experiment will be this lovely blogger's Lavender Raw Cheesecake...I'll keep you posted:)

Here it is...my new blog goal is to start using Jay's fancy schmancy camera sitting in the closet to take my photos so my blog can resemble the quality of this one a little more...so pretty:)

If you didn't notice the links throughout...click here!

Raw 'Cheese'cake

Wednesday, June 22, 2011

Quinoa Taco Salad


You've probably realized by now that we LOVE Mexican flavours in this house! Jay's famous line when we have quests over for fajitas is..."Did you know both of Steph's parents were born in Mexico!!!???"...I think he just loves to see the shock on their faces since we aren't dark haired and Spanish speaking:) And so begins the whole detailed discussion of what a Mexican Mennonite is!

Anyhow...I love a good taco salad!! Who doesn't?! Truth is though, most of them in restaurants are not on the healthy side, at all! This is one that I promise you can feel good about eating! The first time I made this we literally ate it for dinner 'as-is' in the photo...the beans and quinoa make it a complete and very satisfying meal. Our boys loved it too! Great for beach days as their is no creamy dressings in it that will spoil in the sun! Perfect as a side dish for some grilled meat:)

Hope you enjoy it! Wonderful for entertaining too....of course:) Like most quinoa salads, the flavours will be better on the second day.

*once again...my apologizes for the bad photo...was gonna try to edit it a little but iphoto was down:(


Quinoa Taco Salad


1 cup quinoa (cooked to directions on pkg)
3 Tbsp fresh chopped cilantro or parsley, whichever you favour
1 small red onion, diced fine
1 small red pepper, diced fine
1 cup roasted corn kernels (I use frozen, roasted on a cookie sheet for about 10 minutes, then cooled)
1 can black beans
1 large handful of spinach or romaine, per person

Dressing ingredients

1/4 cup Extra virgin olive oil
Juice from 2 juicy limes
1 tsp cumin
1/2 - 1 tsp chili powder or good quality taco seasoning
Sea salt & pepper, to taste

Garnish

Gluten-free tortilla chips
1 large avocado, pitted, peeled, diced

Take dry quinoa...toast it in a dry skillet until it looks brown and smells nutty (this enhances the flavour of the salad a lot)...then cook like usual. Let quinoa cool. Make dressing and drizzle over quinoa.

Add in everything else. Stir lightly to distribute. Taste test for seasoning adjustments. Add garnishes.

It's that simple:)

Serves 4.

More Options


chopped mango
sliced grape tomatoes
crumbled feta
black olives

Thursday, June 16, 2011

Roasted Corn & Chicken Tomato Chowder


This is a great summer soup! The roasted corn and tomatoes taste so good:) We had this the other night...it was kinda a rainy/cloudy day...and I was just anxious to test this idea out! I was optimistic and made a double batch! We were all thankful that I did! Even little Levi gobbled this up for dinner...and lunch again the next day! Even had enough to make a small dish to freeze!

*This could totally be a vegetarian soup simply by omitting the shredded chicken!

Roasted Corn & Chicken Tomato Chowder


1 tbsp olive oil
1 tsp cumin
1/2 to 1 tsp curry or chili powder (I used curry but think chili would compliment the other flavours better..not sure? Use what you love best!)
5 cloves garlic, chopped
1 medium sweet onion, diced
3 ears of corn, roasted, kernels removed (or...it's much easier to use frozen corn kernels roasted on a baking sheet for about 15 minutes, or until 'roasted'...that's what I do!)
1 large sweet potato, peeled, diced
1 14-oz can Diced Tomatoes (if they were in season I would just use fresh and up my broth to 4 cups)
1/4 cup chopped green chiles (totally optional!...we love heat though)
2 cups vegetable broth
1 14-oz can coconut milk (if you are wanting to use dairy, then cream would work too)
2 cups shredded cooked chicken pieces
Sea salt and ground pepper, to taste

Just before serving:

3 tablespoons fresh chopped cilantro (optional...not everyone is a fan)
Fresh lime juice from 2 juicy limes (definitely MAKES the soup!)
*we had a ripe avocado on the counter so we used that for a garnish too...very good!

Directions:

Heat the olive oil in a large soup pot over medium heat and stir in the cumin and curry or chili powder...cook for one minute.

Add the chopped garlic and onion. Stir and cook for five minutes. Add the roasted corn, sweet potato, canned roasted tomatoes, green chiles...stir for a minute. Add in the broth.

Cover and bring to a high simmer. Lower the heat and simmer gently, until the sweet potatoes are tender, about twenty minutes or so.

Add the coconut milk and cooked chicken pieces. Stir and season with sea salt and ground pepper. Increase heat without letting the soup boil.

Some people prefer think soup...some prefer thin...feel free to adjust the broth amount to your liking at this point! This soup will thicken as it sits.

Just before serving, add the chopped cilantro and fresh lime juice. The lime juice brightens the taste and spice. If at this point you find it too spicy or hot for your family, you can lessen that by adding a few squirts of raw agave or honey:)

It goes without saying that this soup tastes even better the next day!

Serves 6-8

Monday, June 6, 2011

Banana Chip & Almond Muffin Top Cookies


Ha! Gotta love that title! I promise these only taste like a muffin top...they will not GIVE you a muffin top! If you don't know what I mean....don't worry about it:)

Yes these cookies basically taste like a muffin top. I had a ton of over ripe bananas...and wasn't in the mood for muffins...so I came up with these. They were an instant hit and super easy...definitely will whip them up again!! I was thankful that I made a double batch - must have been feeling optimistic! Super healthy...filling...and simple:)

Banana Chip & Almond Muffin Top Cookies


1 1/4 c almond flour
1/2 cup quick cooking oats
2 mashed ripe bananas
1/4 c dark chocolate chips
3 Tbsp almond butter
2 Tbsp maple syrup
1 tsp cinnamon
2 tsp vanilla extract
1 tsp baking soda
pinch of salt


Mash bananas...cream in the almond butter...add all other ingredients and stir! Dough will be very moist so I recommend lining your pan with parchment. Scoop out dough into little rounded circles. Bake at 350 for about 15 minutes...or until centers don't seem doughy any more (the same you would for muffins?). Let cool completely on pan...will be moist and delicate at first.

ENJOY!

Tuesday, May 31, 2011

Rhubarb Apple Crisp


And we're back! Sorry for the little break in posting there!

Made this yummy, in season dessert TWO times last week....and forgot to take a picture!! Crazy I know, but I guarantee it was a hit each time with every guest:) Rhubarb is in abundance this time of year...so I thought this would make for a useful post! I just planted our first rhubarb plant in the garden this year...and apparently they spread like fire...so in about 5 years I'll likely be begging some of you to take stocks off my hands!

Hope you enjoy this as much as we did! It goes without saying that vanilla ice-cream compliments this dessert well:)

This dessert is so healthy, the leftovers make for a great breakfast the next morning!

Rhubarb Apple Crisp


makes enough for one average size casserole/pyrex pan

Filling:

8 cups coarsely chopped rhubarb
5 cups coarsely chopped apples
1/4 cup maple syrup
2 Tbsp cinnamon

Topping:
6-8 cups of quick cooking oats (depending on how much you like the topping!)
2 Tbsp cinnamon
1/4 cup melted butter or coconut oil
1/4 cup maple syrup
1 cup slivered almonds (optional...but so good!)

Coat the dish with about 2 Tbsp of melted butter. Add the filling and mix together. In a separate bowl, mix the topping together and sprinkle over the filling. Bake at 350 degrees for about 25 minutes or until the fruit is softened. Serve warm from the oven.

ENJOY!

...I think shredded coconut would also be great in the topping...maybe I'll try that next time!

**I'm worried that altitude may be effecting this recipe...a reader had hers turn out very dry...if this is a concern try adding about a cup of unsweetened applesauce to the apple/rhubarb mixture before baking:)

Sunday, May 1, 2011

Cinnamon Buns


Alright...seeing as I ate one (okay...two!!) of the last few of these this afternoon...sipping a fresh Americano...sitting in the sun...reading while the boys nap...I figured I better post them!

Sorry for the horrible photos...kinda a messy recipe...equals messy hands...makes taking photos tough! I need a baking partner!

Having mennonite roots we grew up on cinnamon buns...yum yum yum...lucky us! My mom and aunts all have the greatest stand-by recipe that is a favourite to many...this isn't that recipe:) I thought I'd venture out and try something different...and was happy with the results! I will definitely bake these again...although there's nothing better than coming home to my mom's homemade baking:) A friend had given me a bag of oat flour...so I was interested in experimenting with it...hence the cinnamon buns! I will definitely continue to bake these with the oat flour in them...it gave them a very light consistency...didn't leave you feeling heavy and blah...infact it made you want to eat more!! My mom's recipe has oats in it...so this taste is a familiar one to me in cinnamon buns. They were great to have on hand for Easter...and are awesome because this one batch made 7 round pans...they freeze great!

Of course there is nothing better than a little cream cheese frosting on top...that is how I served them on the weekend...but we were raised with a little peanut butter on top...that's my favourite:) Want to go on a little adventure...spread some peanut butter on the dough before rolling it up...with the cinnamon...AMAZING! Even made them once with Nutella in them...wow wow wow!!

Alright...here's the step by step. They take a little time...but are so worth it!!

Cinnamon Buns


Start by making the dough. Mix 4 cups of milk (I used almond), 1 cup of olive oil and 1 cup of cane sugar in a large pot. Heat this mixture until JUST before it reaches boiling point (that's called 'scalding'). Turn off heat and leave to cool for about an hour.


When the mixture is lukewarm to warm, but NOT hot, sprinkle in 2 packages Active Dry Yeast.


Let this mixture sit for a minute or two...you'll see the yeast starting to get fizzy and bubbly.


Then add 8 cups of flour of choice. I used 3 cups oat flour, 3 cups spelt and 2 cups whole wheat. Oat flour on it's own wouldn't hold the dough together well...so that's why I added spelt. Spelt also doesn't have as much gluten as other flours, which is what works as a 'glue' for the dough...so that's why I added in the bit of whole wheat.


Stir mixture together. Cover and let sit for at least an hour. I use a tea towel...that's the mennonite way:)


After an hour, the dough will hopefully look like this.


Now add 1 more cup of flour…


1 heaping teaspoon baking powder…


And just under a teaspoon of baking soda and 1 heaping tablespoon of salt. At this point I wondered why you don't put cinnamon right into the dough...you know, add flavour to it??!! So I tried it...and REALLY liked the results! I sprinkled probably about 3 tablespoons full on top and then mixed everything in.

At this point, you could cover the dough and put it in the fridge until you need it—overnight or even a day or two, if necessary. Just keep your eye on it and if it starts to splurge out of the pan, just punch it down. Or, of course, you can just go ahead and make the rolls...that's what I did!

Sprinkle surface generously with flour. Take half the dough and form a rough rectangle.


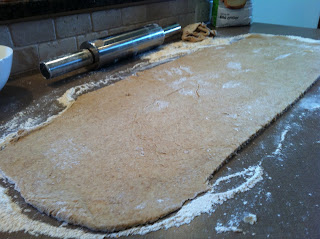
Now drizzle about 1/2 cup to 1 cup of butter over the dough. I know for sure my mom skips this step! Organic pure butter actually has some health benefits...so if you're using the real stuff, then go ahead and indulge yourself!


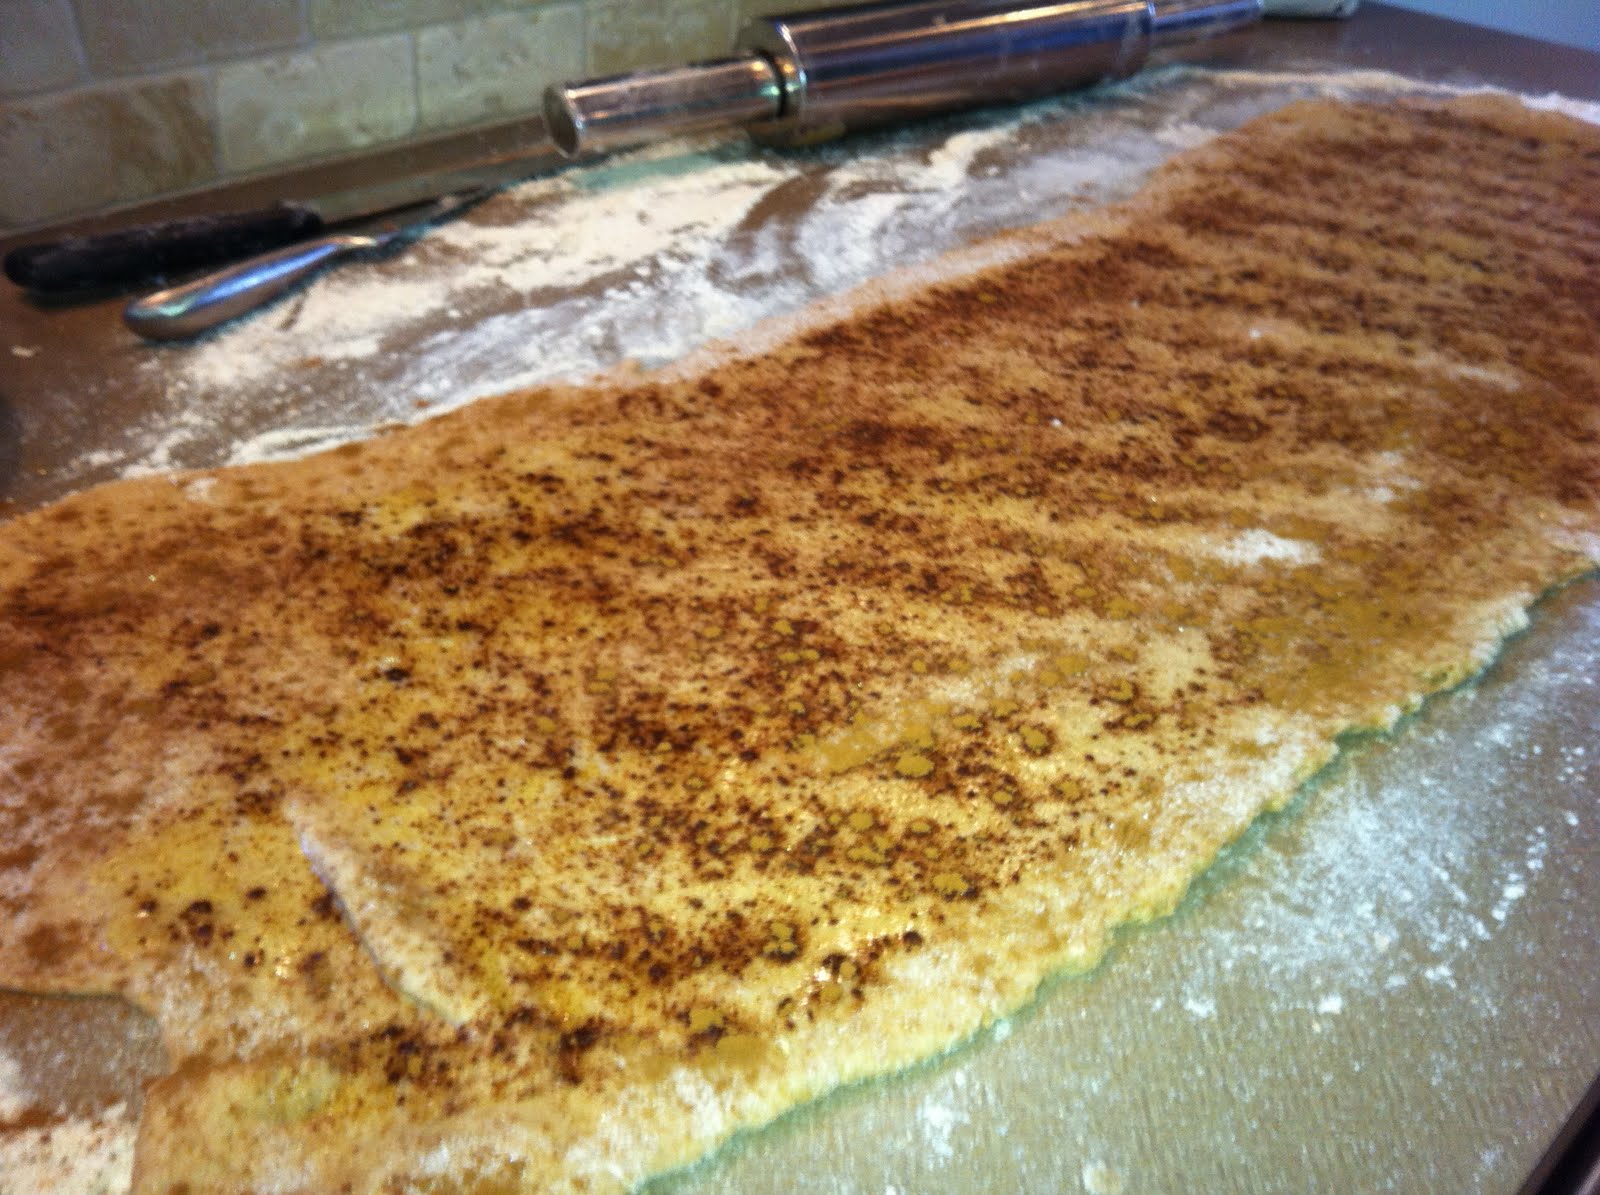
Now sprinkle about 1 cup of cane sugar over the butter…I know you're wondering if honey or maple syrup would work instead! Both of those options would just run out of the rolls while baking and leave a burnt edge...not good...if there's ever a time for cane sugar, this is it!

…followed by a generous sprinkling of cinnamon.


Now, starting at the opposite end, begin rolling the dough in a neat line toward you. Keep the roll relatively tight as you go. Some of the butter/sugar/cinnamon mixture may ooze out toward the end, but that’s no big deal.

Next, pinch the seam to the roll to seal it.


Spread 1 tablespoon of melted butter in seven round, foil cake or pie pans. Then begin cutting rolls approximately 3/4 to 1 inch thick and laying them in the buttered pans. Repeat this process with the other half of the dough. This recipe makes approximately seven pans of rolls. I use the disposable aluminum tins purely so I can give them as a gift and not need to worry about the dish!


Let the rolls sit for 20 to 30 minutes to rise (covered again with your lovely clean tea towel), then bake at 350 degrees until light golden brown, about 20-22 minutes.


Ingredients


4 cups Almond milk (or milk of choice)
1 cup olive oil
1 cup cane sugar
2 packages Active Dry Yeast
8 cups (plus 1 cup extra, separated) flour of choice
1 tsp (heaping) baking powder
1 tsp (scant) baking soda
1 tbsp(heaping) salt
3 tbsp cinnamon
1 cup (or more) of melted butter
2 cups cane sugar
Generous Sprinkling Of Cinnamon


Instructions

Mix the milk, oil and sugar in a pan. Scald the mixture (heat until just before the boiling point). Turn off heat and leave to cool forq 1 hour. When the mixture is lukewarm to warm, but NOT hot, sprinkle in both packages of Active Dry Yeast. Let this sit for a minute. Then add 8 cups of flour. Stir mixture together. Cover and let rise for at least an hour.

After rising for at least an hour, add 1 more cup of flour, the baking powder, baking soda, salt and cinnamon. Stir mixture together. (At this point, you could cover the dough and put it in the fridge until you need it – overnight or even a day or two, if necessary. Just keep your eye on it and if it starts to overflow out of the pan, just punch it down).

When ready to prepare rolls: Sprinkle rolling surface generously with flour. Take half the dough and form a rough rectangle. Then roll the dough thin, maintaining a general rectangular shape. Drizzle 1/2 to 1 cup melted butter over the dough. Now sprinkle 1 cup of sugar over the butter followed by a generous sprinkling of cinnamon.

Now, starting at the opposite end, begin rolling the dough in a neat line toward you. Keep the roll relatively tight as you go. Next, pinch the seam of the roll to seal it.

Spread 1 tablespoon of melted butter in a seven inch round foil cake or pie pan. Then begin cutting the rolls approximately ¾ to 1 inch thick and laying them in the buttered pans.

Repeat this process with the other half of the dough. Let the rolls rise, covered for 20 to 30 minutes, then bake at 350 degrees until light golden brown, about 20-22 minutes.

Freeze amazing!

ENJOY!!!!...with friends:)